Cedral cladding is an easy to install system, but as with any DIY there are certain things you may not be aware of and a few common mistakes to avoid. We often get asked questions on cladding installation on external walls so we have put together 7 handy pointers in hope your install goes as smoothly as possible.
1. Follow the manufactures guidelines
To get the most from this highly durable cladding product, you must install according to the manufacture’s guidelines. Cedral produce an easy-to-follow PDF cladding installation guide as well as a series of really useful, quick to watch video guides.
Your external cladding will be on your building for decades and so we can’t recommend highly enough spending around 30mins doing some research before your build.
2. Do you need planning permission to install cladding?
Before you plan your project it is advisable to check with your local planning office to see if you need planning permission to install cladding onto your property. This is usually needed if you live in a Conservation Area, a National Park or an Area of Outstanding Natural Beauty, or if the materials are not of a similar appearance to those used in the construction of the house.
3. Properly handling and storing your cladding boards
Whilst robust once installed, Cedral fibre cement cladding does need careful handling to avoid chipping the boards or scratching the paint.
When unloading a pallet & restacking for storage, you should ensure that there is plastic sheeting between each paint finished side to ensure the boards do not rub against each other which can cause scratches on the painted surface.
Cedral Click boards need extra care to ensure the tongue and groove edges do not overlap each other when stored as this can lead to damage to the lip of the boards.
It is important that Cedral cladding is kept dry when stored before installation. If you cannot store your weatherboard inside or undercover, you should ensure sufficient sheeting is available to cover the whole pack to protect it from getting wet. Never install wet Cedral boards.
4. How to ensure the correct airflow in your cladding installation
To ensure proper ventilation of your weatherboard cladding it is recommended using a minimum of 38mm deep battens installed at a maximum of 600mm centres to give the required 30mm airflow.
The most common issue that leads to board failure in an installation is insufficient airflow, Perforated closures should be installed top and bottom of your battens to ensure insects like bees or wasps can’t get behind your cladding to nest which would cause block ventilation, likewise horizontal noggins shouldn’t be used between vertical battens either as this will also block airflow.
5. Planning your layout
In an ideal world, for an easy and quick install, your cladding boards would line up to utilise a full width board above window and door heads instead of having to cut boards into the frame.
The best way to ensure this, is to measure and mark out first and potentially cut down your 1st board horizontally to a narrower width to ensure easier install above doors/windows.
6. Tools you need to install Cedral fibre cement cladding
Cedral cladding doesn’t require many tools at all to install but there are a few on the market to make your job easier.
If you’re wondering how to cut fibre cement cladding boards, it is advised to have the correct type of blade as the material will dull most blades quickly, a diamond tipped blade will cut with ease and not blunt like others on the market. If you are only making straight cuts for the Cedral lap board system, a guillotine will pay for itself on even the smallest projects and eliminate dust when cutting the board.
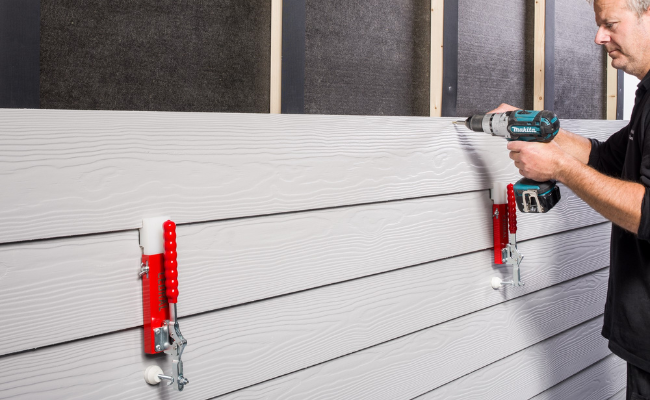
If installing Cedral Lap cladding boards on your own, the Cladman tool is indispensable and will allow for easy and fast install of the boards without needing another person to hold the boards for fixing.
7. Which fixings are best for installing Cedral cladding?
There are several options for fixing your Cedral cladding depending on preference.
Cedral Lap (Overlapped) Boards
For the Cedral Lap you can use either Stainless Steel screws, Stainless Steel nails or nail gun nails, personally we would recommend screws every time as mistakes happen and you can always unscrew a board with relative ease.
Cedral Click (Tongue & Groove) Cladding Boards
The Cedral Click uses a hidden clip & screw or hidden clip & rivet depending on the subframe you are installing the boards to.
For both lap and click cladding boards you will want to use a colour matched dome head screw for your top run of boards where your fixings will be visible.
Hopefully this has given you some handy tips but if there are any further questions about your project, please do not hesitate to contact our sales team.
You might also like to read:
Can I paint cladding? A guide to options for metal, fibre cement and timber cladding


